Making a video? A short piece? A story? A full movie? This is a little guide I put together to help you get going:
FILM MAKING
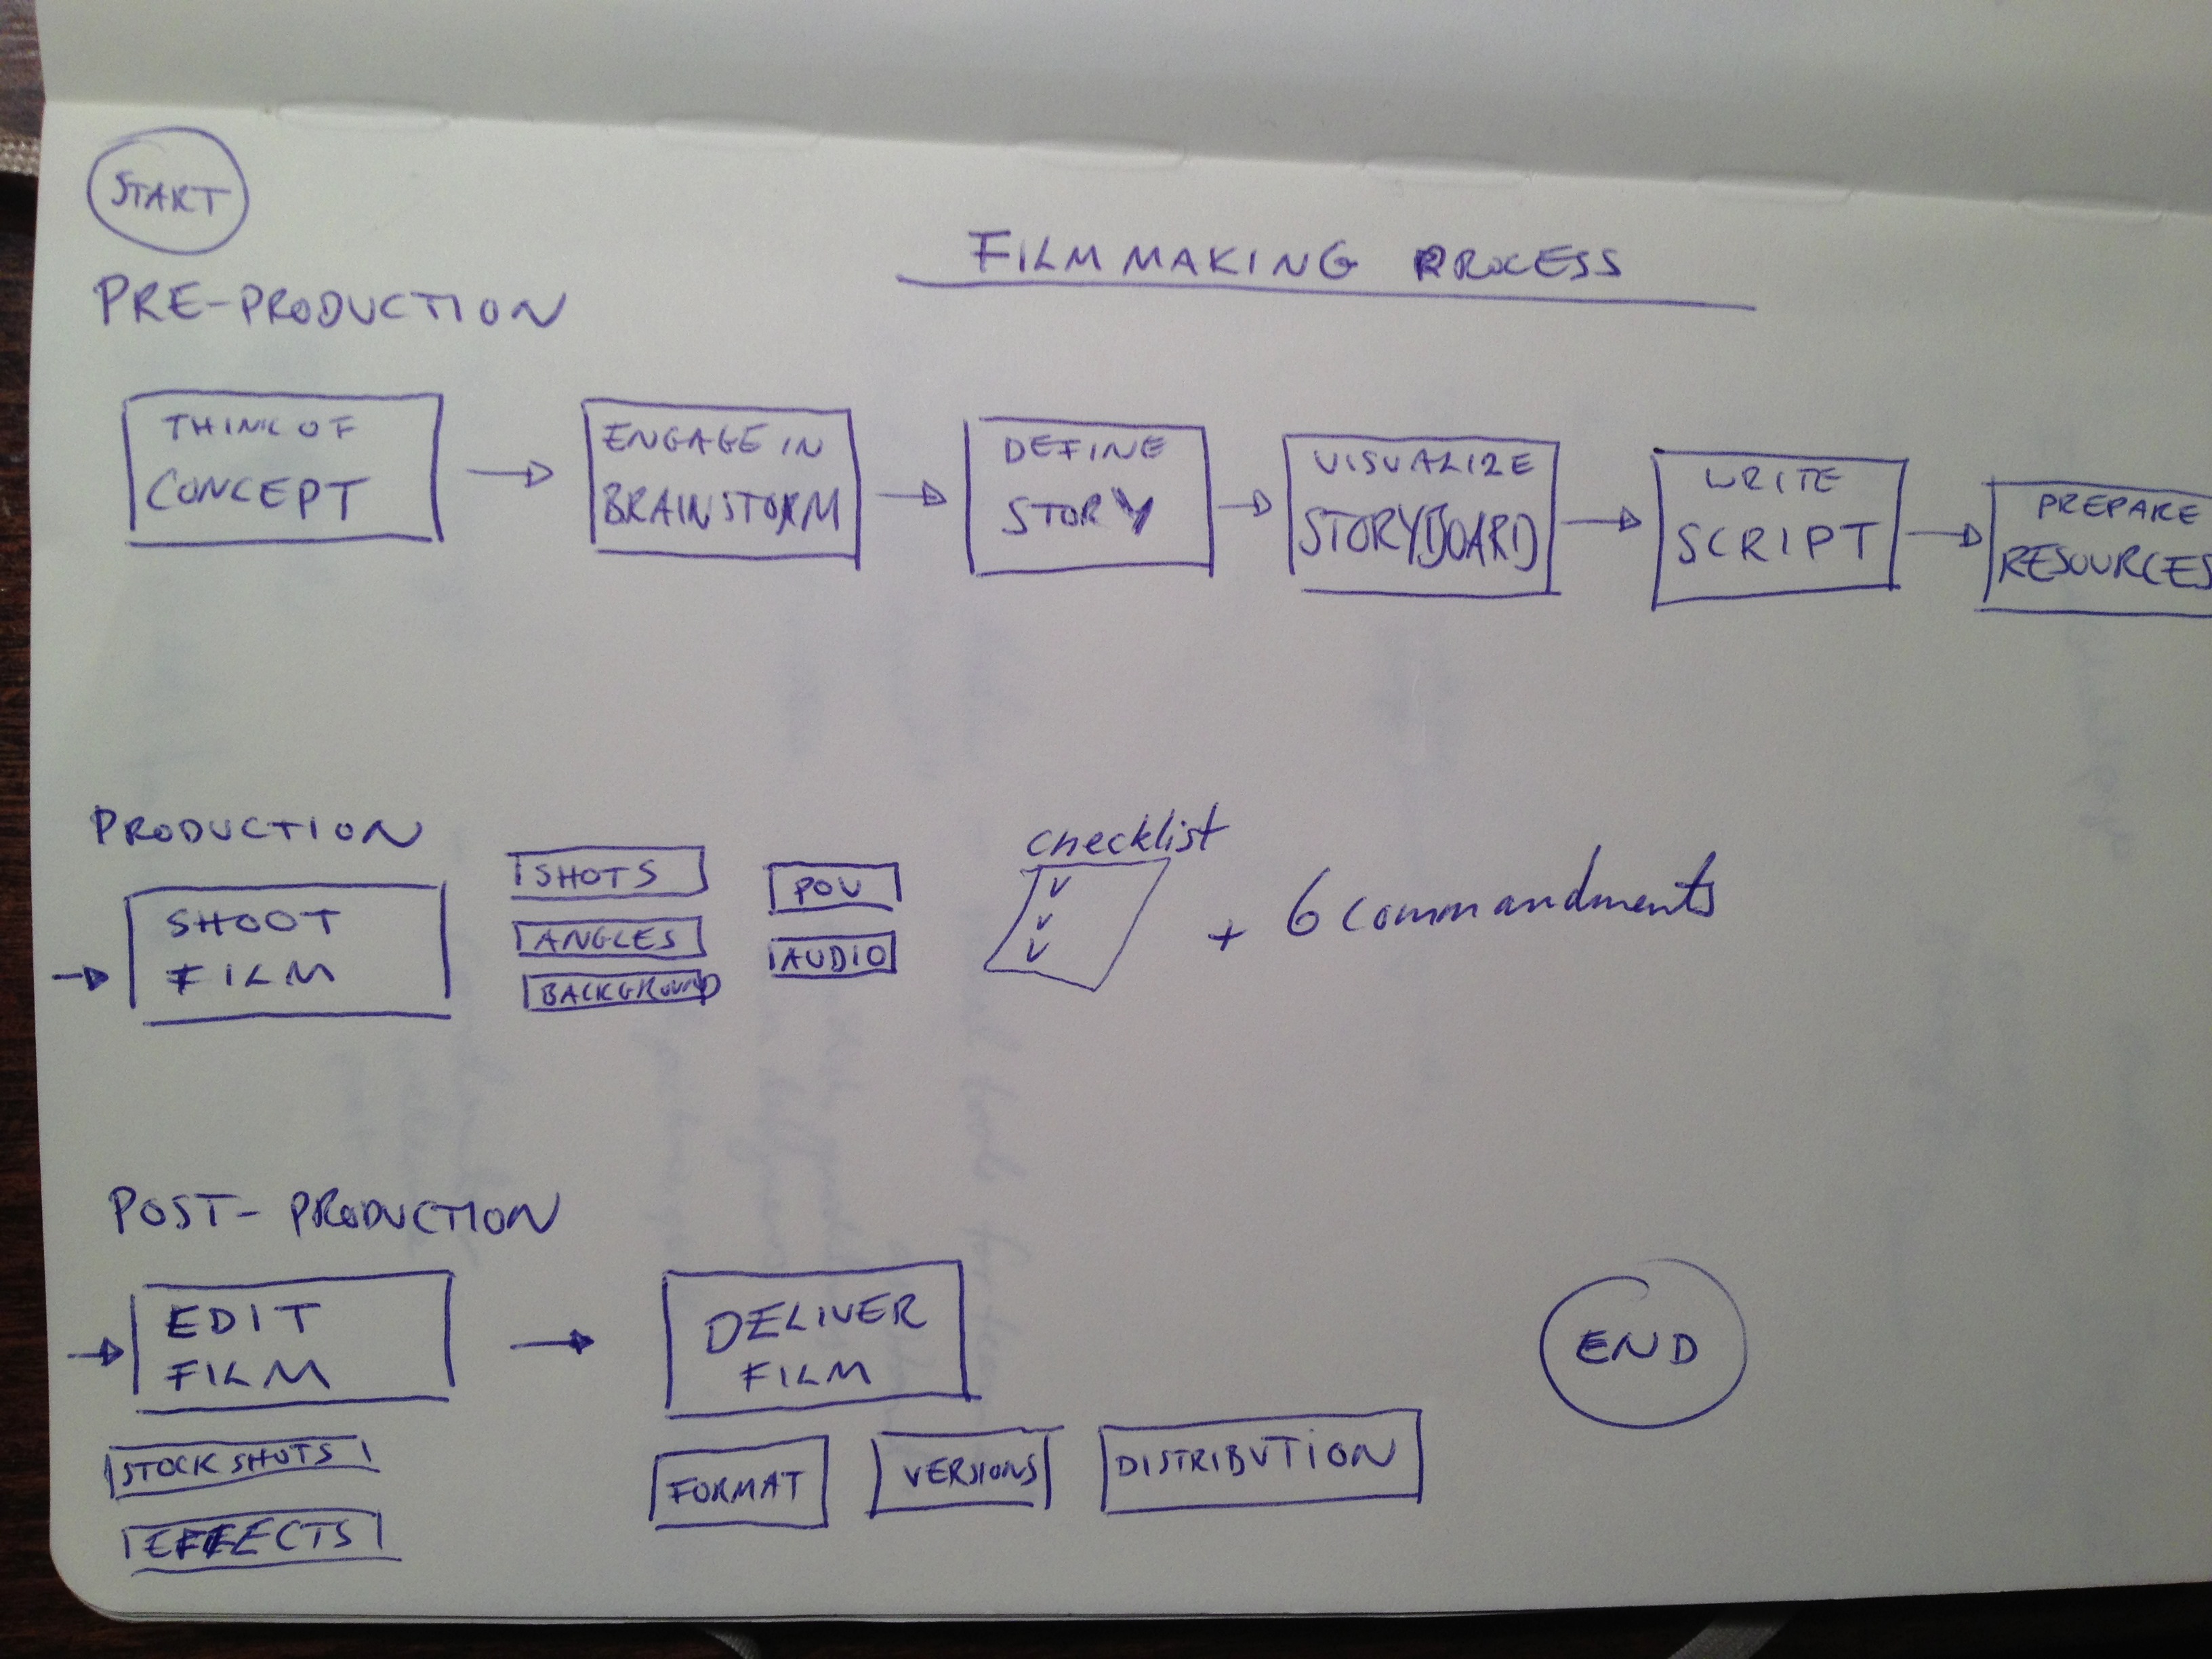
Making a film or a short video interview includes several activities which forms a process. The main parts of the process are: PRE-PRODUCTION, PRODUCTION and POST-PRODUCTION. Each part breaks down to more detailed activities. The description of the process of film making follows below:
1. PRE-PRODUCTION (6 main activities)
THINK OF CONCEPT – have a plan to use your time and resources efficiently. Spend those extra hours or days working on the concept and you’ll see how easy the production will be. Compare it to planning a a birthday party for your friend or kids. More planning = less work for you and happier participants. The idea should be explained in a few selected words not more. For example “It’s the story of a lumberjack who cuts everything”
- WHO: AUDIENCE – identify who your audience is. Clearly if you don’t know who you’re targeting, your video won’t be good. You can’t satisfy everyone, so select and focus on the audience which matters the most for you
- WHAT: MESSAGE – what do you want to say?
- HOW: THE WAY – how are you going to say it?
- WHY: And why?
ENGAGE IN BRAINSTORM – once you have a first draft of the concept, do a brainstorm. Take out the best ideas and check which ones will work the best. Think in terms of what is most creative and effective at the same time. It has to meet the message, audience and your resources (time, budget, experience and more)
DEFINE STORY: NARRATIVE STRUCTURE – setting and character development. Story comes to a conflict and ends at conclusion.
VISUALIZE STORYBOARD – create a storyboard to visually guide the parts you want to shoot.
WRITE SCRIPT – write the dialogues and the narration (if there is a voice-over). This will be your blueprint for the action, narrative and dialogue.
PREPARE RESOURCES
- People (both on and behind the camera)
- Location (permission, light, noise, accessibility, transport)
- Graphics
- Music
- Props
- Outfit
- Equipment
2. PRODUCTION
SHOOT FILM
DEFINE TYPES OF SHOTS
- CU – Close up
- MS – Middle Shot (from waist up)
- LS – The whole body
CU – to enhance something that is being said. A moment of truth.
MS – you will want to either fully exclude or include hands moving. If the person is used to talking a lot with their hands, make sure they are always within the frame of the shot.
Combine different types of shots to give more character. When you see the face better you have as a viewer a better view of understanding the person who talks. It gives a more clear personality.
DEFINE ANGLES
- Use the golden ratio
- Film over the shoulder when conversations
- Cutaway shots show what’s being talked about.
- Don’t be afraid to get in there
- Avoid conflicting angles.
DEFINE BACKGROUND
Make use of natural lines. It adds a dynamic dimension if something happens in the background. Be careful to use proper distance.
CONSIDER POINT OF VIEW (POV)
- I/me – first person
- You – second person
- They – third person
ASSESS AUDIO
- Keep the microphone as close as possible to the source.
- Consider music to set the mood, pace and/or tone.
- Sound effects to add impact and/or realism
(!) CHECK LIST FOR SHOOTING
- Study and be aware of all features of the camera you are using before you take it out on location.
- Be especially familiar with these items: tripod, auto-focus, record button, zoom, battery pack.
- It is best to shoot with the light behind you. Put your subject facing toward the light.
- Partial light and shadows. This can happen when the sun moves. Avoid o have this movement especially when reflected on the face of the subject.
- The subject should be plead with the direction towards one side – rather the opposite side of the golden ratio – to allow for space if movements with hands.
- Always charge your battery pack overnight and have an extra one for backup.
- You can use the camera on a tripod, cradle the camera for a low shot, or steady the camera on your shoulder. The key is to always stabilize your camera.
- Overshoot your scenes. Better to have too much that not enough footage.
- Use zooms with caution! The further you zoom in, the shakier the shot gets. Take too long, not very dramatic.
- Physically moving the camera like humans see can be an interesting point-of-view shot.
(!) The Six Commandments
- No video or images from copyrighted sources! This includes just about anything you can think of!
- Get Release Forms From Everyone On Camera!
- You Have 60 Seconds. That’s It!
- Follow your plan.
- Keep message simple and focused.
- Have Fun!
- It’s just a movie, not brain surgery!
- Learn. There’s no right or wrong way to do your essay.
- Look at how others do it; learn from their work.
- Be creative! Ask, “How else could we do it?”
3. EDITING
FIND STOCK SHOTS (pictures) to give context to the interview. If it is an interview, the stock-shots helps to show who she is, what she has done.
Ken-Burns effect is good. Go from out to in when talking about a person. If two people, rather use more time as the viewer must focus on two object of the image.
ADD SPECIAL EFFECTS -using special effects is fine. They can add to your production, but be careful not to overuse them. They can be too gimmicky. Less is more.
DELIVERY
DEFINE FORMAT – which is the primary format, alternatives needed?
CREATE VERSIONS – will multiple edits be needed? Such as version with subtitles.
DEFINE DISTRIBUTION CHANNELS – where will the video be published? How can it be optimized for higher views.
